Matt's Bleeding-Red Milwaukee Reno Trailer
RIG DETAILS
| USED FOR | Construction |
| MODEL | Carmate |
| BODY | Enclosed Trailer, Flat Nose |
ORGANIZATION

Matt uses his contractor tool trailer for remodeling and construction in New Jersey. Saying that he has a strong focus on Milwaukee and Festool power tools is putting it mildly! The build is partly impressive just because he added lots of paint and flooring that make the trailer look good and help to make tools stand out.
See More:

The Trailer
The foundation of this build is a Carmate 7x16 enclosed cargo trailer with barn doors.
The trailer has a walkable roof with a small ladder on the front for easy access.
The Battery Depot and Granite Counter
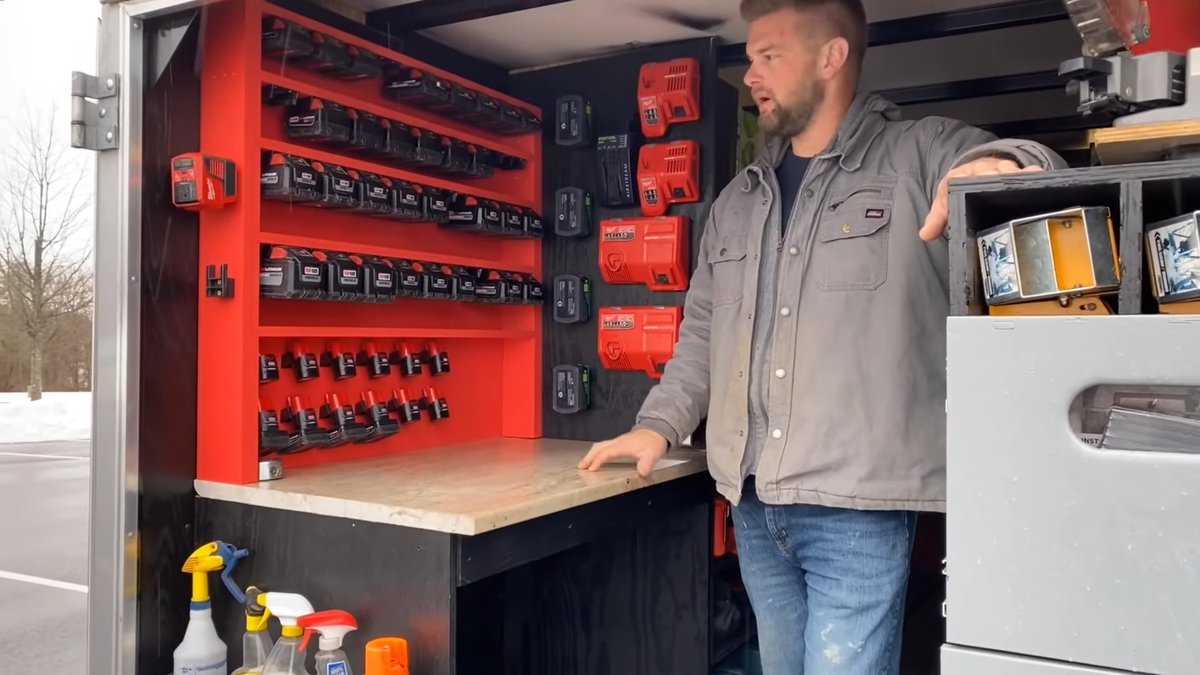
Matt's love for Milwaukee tools is on display right when you open the rear doors. A battery charging and holding station is set up over a granite-topped workbench.
Batteries are slid into individual holders along the wall, and Festool and Milwaukee chargers are mounted along the adjacent shelf wall.
One great feature at the bench is the four gang electrical box that holds both trailer-supplied and shore power 120 volts to the workbench.
Many contractors need to do a little configuring each time they switch from shore power to inverter power on the trailer, but Matt's method will keep him from having to switch wires and cords around. One side of the box has a white outlet and the other side is ivory, which is a nice visual indicator for which outlet should be used.
Almost All Cordless Tools
Most of the tools on this trailer are cordless - Matt even uses cordless nailers. That said, he still uses an air compressor powered coil nailer for roofing and an air nailer for joist hangers.
Some contractors aren't big on cordless electric nailers, so it's nice to see someone making it work. If you can eliminate uncoiling your air hose, plugging in your air compressor, and starting the whole setup, you can save a lot of time. It's also a lot quieter for your customer and their neighbors (who might be future customers!).
Matt divides many of the tools into M12 and M18 variants. The M12s are a little more compact and take up less space.
Paulk Drawers
Matt used Ron Paulk style drawers to store small hand tools and consumables. These drawers are plywood and "lock" closed for driving.
Tools on Display
In the front of the trailer several cordless tools are positioned for easy access. A side effect of the positioning is that they look good, too!
To get a little more storage space out of the front, Matt put the shelves on sliders that move back and forth across the width of the trailer. Sliding one of these shelves over reveals another shelf with tools behind it. Hinged and sliding storage is something we're excited to see more of since there aren't too many work vans and tool trailers that are using it.
Matt made sure tools that are used the most are positioned closest to the side cargo door. Ideally, these tools can be reached from outside the trailer at the door.
Paint for Feel-Goods
Most tool trailer builders don't paint the inside of their trailers. It adds to the build time and makes it a little more expensive. This build is a good example of how painting can make your tools stand out so that it's easier to see if something is missing.
Well-organized tool trailers and work vans also make customers feel good about the quality of your work - if you take care of your work, you'll take care of their house. A decent paint job only reinforces that.
Battery and Inverter
At the front of the trailer is a small battery charger. The charger keeps the trailer's deep cycle batteries topped up. Deep cycle batteries are better in this type of setup where the battery will be deeply discharged on a regular basis. A typical starting battery has a hard time being repeatedly discharged and recharged, but that's what a deep cycle battery is built for.
The batteries connect to an inverter which provides 120 volts to the rest of the trailer.
In order to charge the trailer's batteries and provide grid power to it, a cord reel is mounted on the outside front corner near the shore power plug. This is the first trailer we've seen with this setup and it sure makes it a lot easy to deal with than snaking an extension cord out every time you need to hook up!
Compressor and Saw on Milwaukee Packouts
This is a tool trailer idea we haven't seen yet: securing big tools to a Packout.
Matt uses Packout brackets to secure his two largest Packouts to their storage location. On top of each of these tool boxes he attached another Packout bracket. To the brackets, he bolted on his Milwaukee table saw ans air compressor.
To bring the saw or compressor on site, he just needs to detach the compressor/saw Packout bracket from the top of its respective Packout.
What are the benefits of this setup?
First, Matt gives himself a large blank space that he can reconfigure in the future. He can remove the Packout brackets and put something else there since the spot isn't filled with a plywood cabinet or shelves. In a typical build, large tools like saws get their own dedicated large cubby, but not here.
You might imagine whether you can use this idea in other ways in order to increase the modularity of your tool organization or to combine tools that you use together. If you have a crew that uses a bunch of nailers, it might save time to put all the nailers with air hose and some supplies in the associated Packout. This kind can be locked on to a cart and transported on to the job site easily.
Long Drawers
At the rear barn doors, Matt built some long, no-hardware drawers. He used plywood and dado joint to make his sliders. If your drawers are tough to open, rubbing wax or regular old bar soap on the bottom can really help them slide.
Next to the drawers he has some slot storage for Ron Paulk workbenches and sheet goods.
Four folding sawhorses fit in slots above the drawers.
Conclusion
Matt has a great looking trailer that will make him an instant hire for some customers.
By adopting the "tool display" look and putting on some paint, he provides good visual cues for whether he's missing a tool. Attaching large tools to his Packouts with a bracket and some plywood is an interesting idea that we hope will be tested by other builders in the future.
Get work trucks and tips in your mailbox.
Your time is precious. We write about organization, tools, and techniques that make tradespeople work faster and more efficiently. Subscribe to get our articles and tips in your inbox.
We will not spam you.